WM-918 Weather Station Schematics
Interconnect

Layout

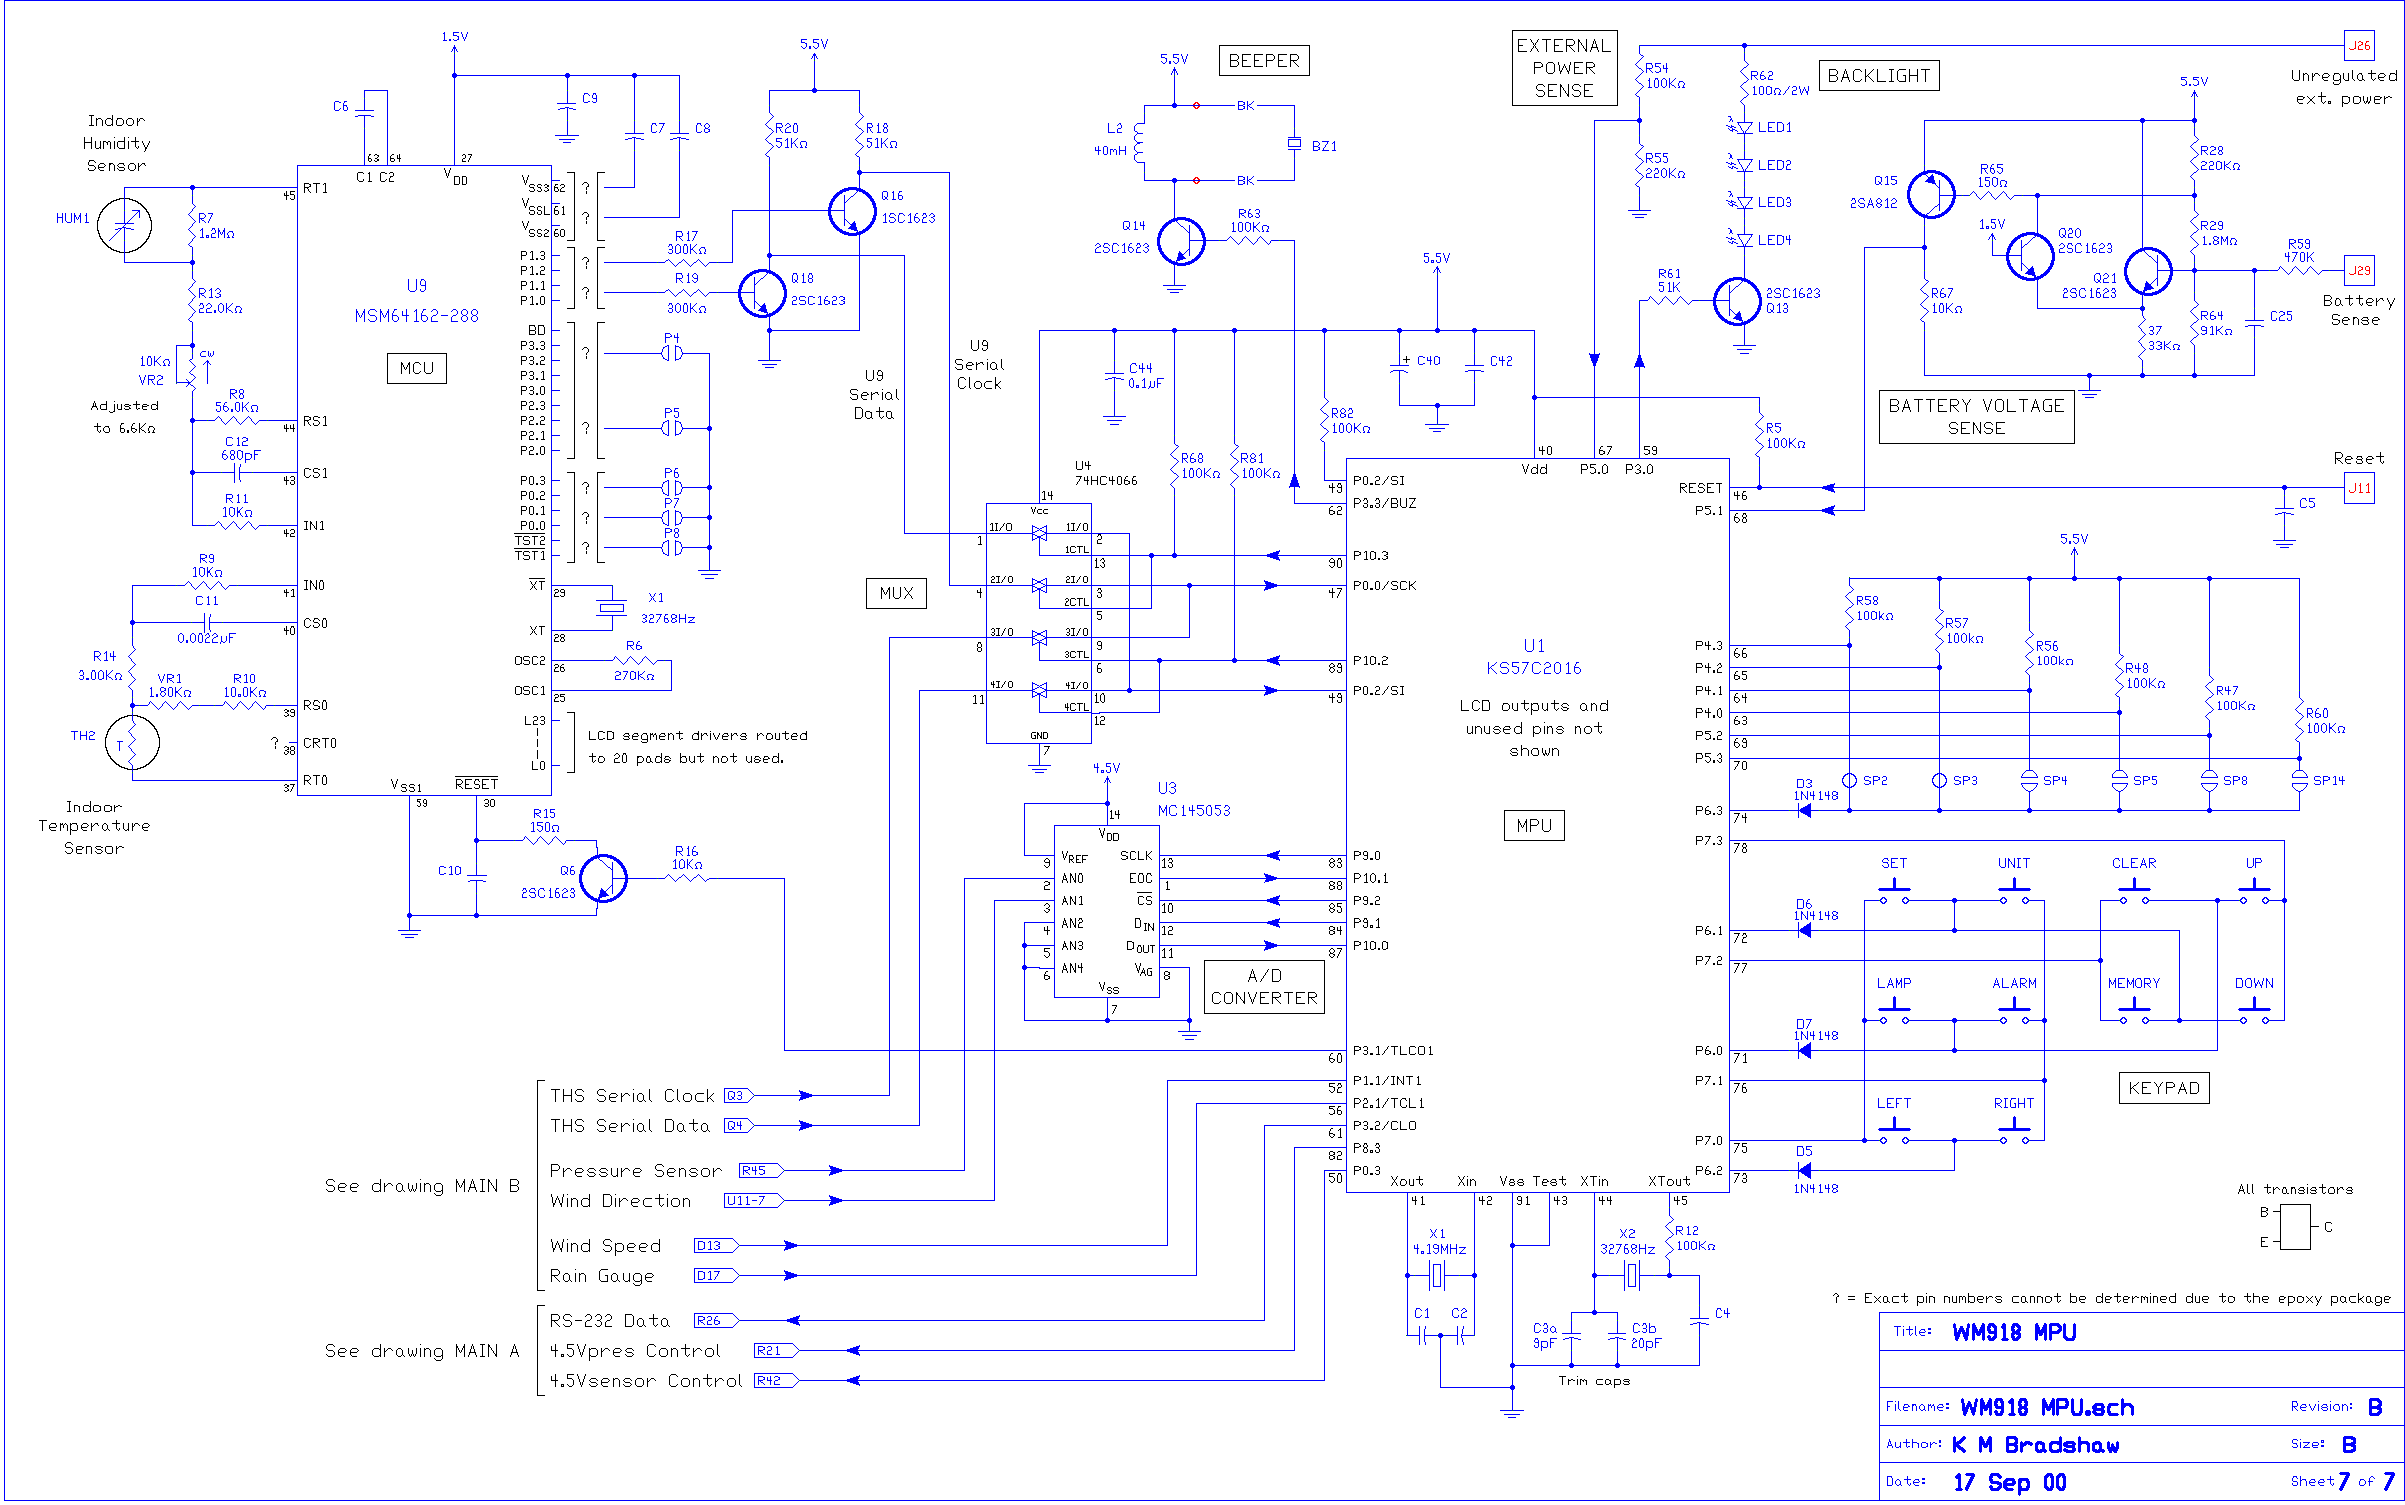
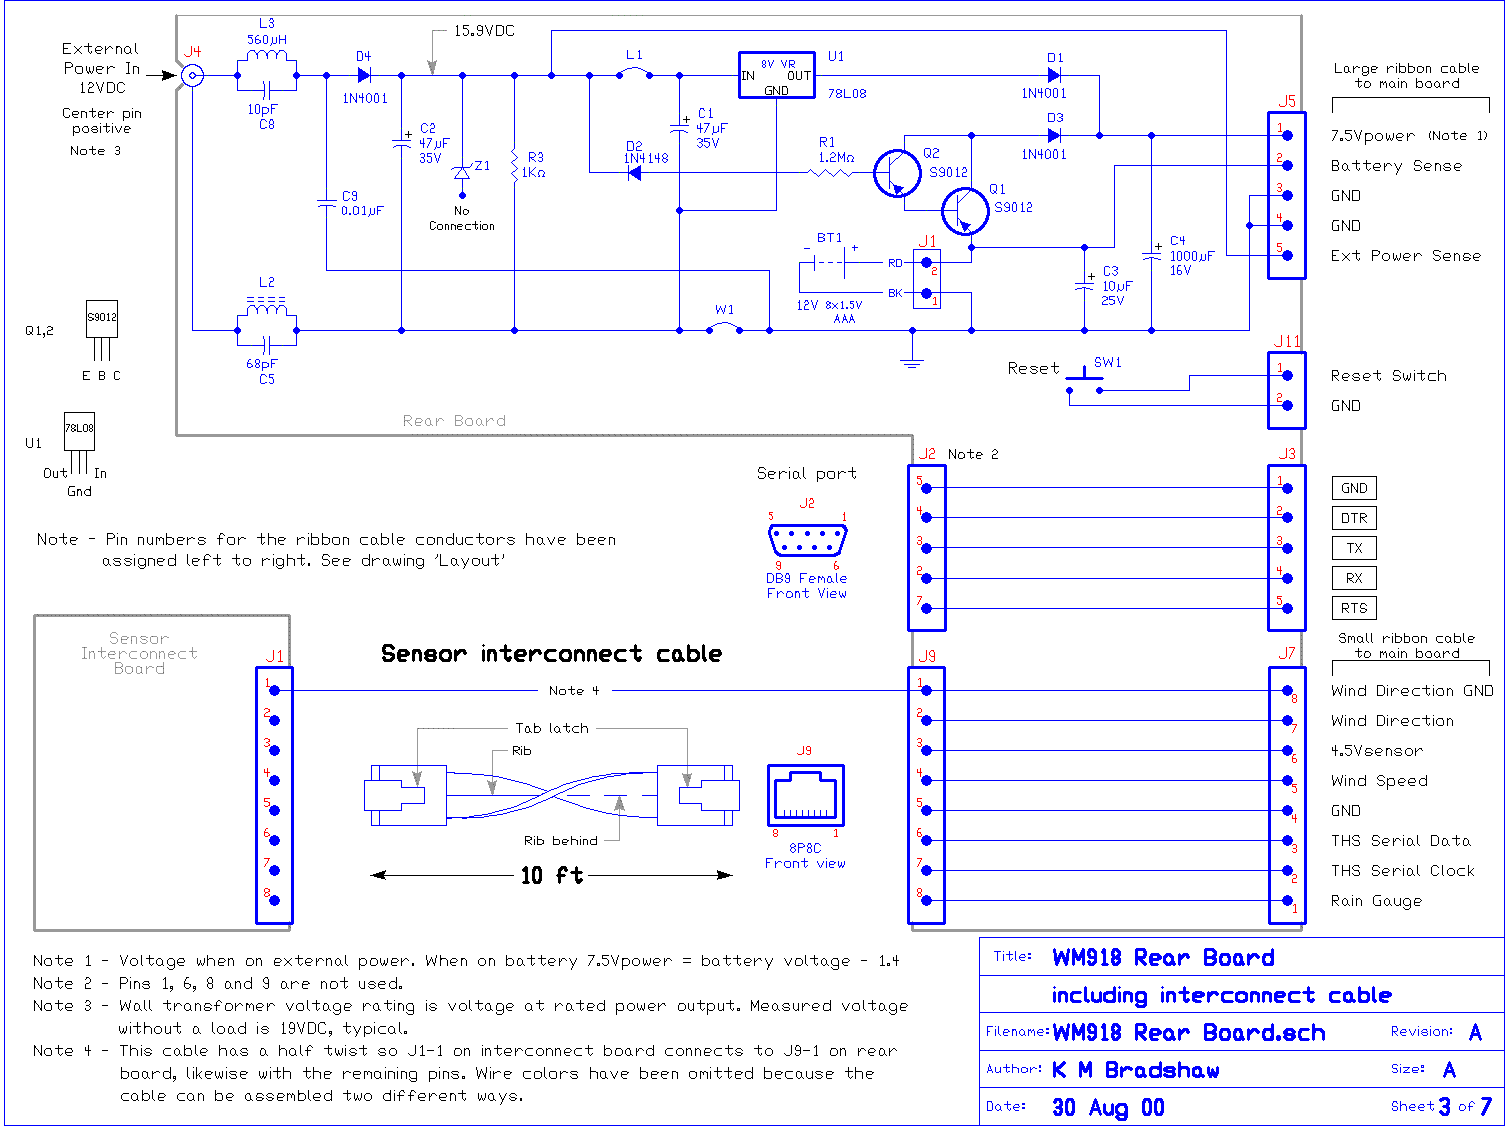
Main Board (a)

Main Board (b)

Microprocessor

Rear Board

Thermal Sensor

Two Comms


WX200 Weather Station

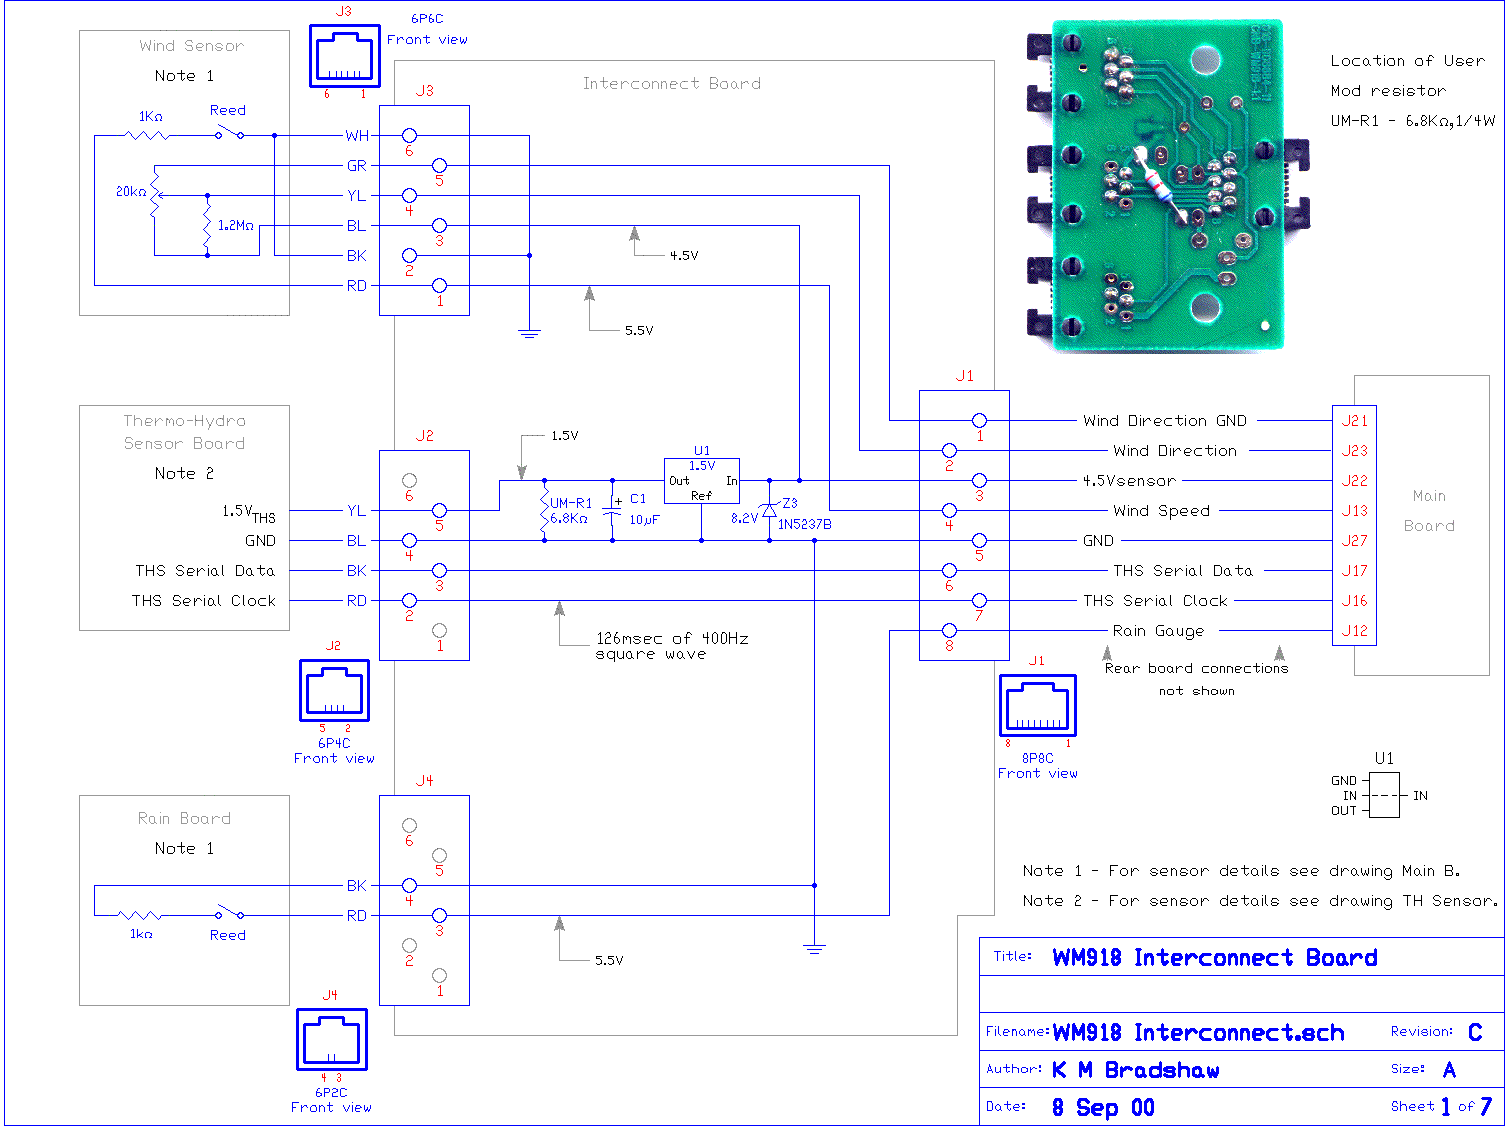
WM918 User Mods included on the Schematics

TH sensor pulldown resistor
This is a very simple modification that can help the external temperature/humidity (TH) sensor to work properly. Soldering is required. Rest assured - even if this mod doesn't help with your "----" problem, if properly installed, it will not adversely effect your weather station.

Problem:
Occasionally the display shows "----" for external temperature and humidity.
NOTE: The other most common problem that causes "----" is light contamination of the TH sensor micro-controller. That is another mod.

Explanation
The TH sensor uses the interruption of its power supply voltage to reset the micro-controller. The reset signals the TH sensor to compute the temperature and humidity and send the data to the main unit. Without the reset signal communication fails and the main unit displays "----".

It has been observed on some units that the TH sensor power supply line remains high too long after the voltage has been removed. This is most likely due to capacitance. Under certain conditions the TH sensor never gets a reset signal and subsequently does not transmit its data.

The Fix
This mod puts a 6.8K ohms resistor between the power supply line and ground. This helps to drain the voltage off the line and ensure a proper reset of the TH sensor micro-controller.

You'll need a 6.8K ohms, ¼ watt resistor (or one close to that value) and a soldering iron.
1. Find the picture on the Interconnect Box page. There is also a picture on the schematic WM918 Interconnect.gif.
2. Unplug all the cables from the interconnect box and remove the two phillips head screws on the bottom.
3. Gently pull out the circuit board and solder the resistor as shown in the picture. Resistors have no polarity so it doesn't matter which way you put it.

Rain Gauge Opto-coupler
Ted Meyer came up with this mod because he was getting rainfall indications in spite of the fact that it hadn't rained. With further investigation he determined that the false rain signal was being generated whenever he started large electric motors like his air compressor. (A water pressure pump caused problems at Veteran station) Aside from this mod his station is out-of-the-box original equipment. This mod requires soldering and very basic familiarity with electronics.
Problem False rain readings
Explanation The wind speed and rain gauge circuits are, by poor design, very susceptible to interference. The short version is the 'normally open' wires connected to the high impedance inputs of the MPU act like antennas.
Since the two circuits are nearly identical random interference may effect both but evidence of a problem is usually only detected on the rain gauge. In this particular situation nearby electrical equipment is producing a pulse on the rain gauge circuit that the micro-processor unit (MPU) detects as a valid bucket flip. The wind speed circuit is probably also getting some extra pulses but these are not detectable in the thousands of valid pulses.
A large book could be written about all the types of interference that can prey on your weather station. This mod may help other forms of interference but I don't know for certain. According to Ted this mod has completely eliminated false rain readings in his situation. (and mine)
The Fix This mod places an opto-coupler between the rain gauge and the MPU. This works because it lowers the impedance that the "antenna" is connected to. Small induced voltages are not able to forward bias the diode but the reed switch will.
The schematic WM918 Main B.gif has the wiring info for this mod.
What you'll need:
Soldering iron, common tools, razor knife
24 AWG wire, preferable stranded
Heat shrink tubing or electrical tape
Glue
Opto-coupler - 4N35 or similar
0.1µF ceramic capacitor
1. Unplug and open the main unit by removing the three screws on the back. The two halves are difficult to separate because the top edge has interlocking tabs. Pry gently while pressing the back half downward. Flatten the ribbon cables so the two halves will lay flat on the bench. The conductors in the ribbon cables will not tolerate repeated bending or flexing.
2. The 4N35 is a 6 pin dual in line (DIP) package. It can be glued dead-bug style (upside-down) in the bottom corner of the front case adjacent to the two electrolytic capacitors. First, solder the capacitor across pins 2 and 4 (not polarity sensitive) then attach wire leads on the four appropriate pins. Insulate the joints with tape or heat shrink tubing.
3. Glue the chip in place.
4. Using a razor knife cut the link between the two halves of jumper SP7. The half that is connected to J12 gets the wire from pin 2. The other half gets the wire from pin 5. Make sure these connections lay flat so as not to interfere with the ribbon cable when the unit is reassembled. Also check that a solder bridge has not reformed over SP7.
5. Pin 1 goes to 5.5V which can be found many places like the positive lead of C39. Pin 4 goes to ground which can also be found at C39.
6. Before closing up check that the rain gauge is working properly.
Additional Opto-couplers also come in dual packages so both the rain gauge and the wind speed circuits can be modified with one chip.